

Hello Everyone !
I always adopted the following philosophy;
You don’t have to know everything exactly but you have to know everything.
I try to learn everything because I try to have an idea about everything. Therefore, on this site, I share information on web security, reverse engineering, CTF and the system. I don’t master all of these topics. I’m just curious and investigating…
In this series, it will be practically penetration test about Active Directory. Active Directory is the directory service used on Microsoft networks. Active Directory stores all information of the organization, such as users, computers, locations, printers. If you pay attention to this site, I’ve always posted information on the practice. I’m not going to give much theoretical knowledge in this series.
At the end of the article, you can find theoretical information about Active Directory from the links. In the first article of the series, we will install our own Active Directory lab. The lab to be prepared will be on the command line. I will share lab configs from GitHub.
Let’s start !
In our Active Directory lab;
- DC (Domain Controller) is the name given to computers that establish the domain structure and store the database of each Object within the domain. Therefore, we will need 1 DC (Domain Controller).
- We will add 1 ADC (Additional Domain Controller) to reduce the workload of the domain. If the first DC crashes, jobs will be executed for a certain period of time via ADC, users will continue to log in and some services connected to the directory service will not be affected.
- 1 Client with which we will perform the penetration test.
You can download the Windows Server 2019 ISO file and Windows 10 ISO file from the addresses given below;
https://www.microsoft.com/en-us/evalcenter/evaluate-windows-server-2019?filetype=ISO
Windows Server 2019
https://www.microsoft.com/tr-tr/software-download/windows10ISO
Windows 10
MASTER19
We will have the possibility to install more than 2 servers in the future. Therefore, we will install a machine named MASTER2019 and copy the other servers on this machine. Thus, we will speed up the installation processes.
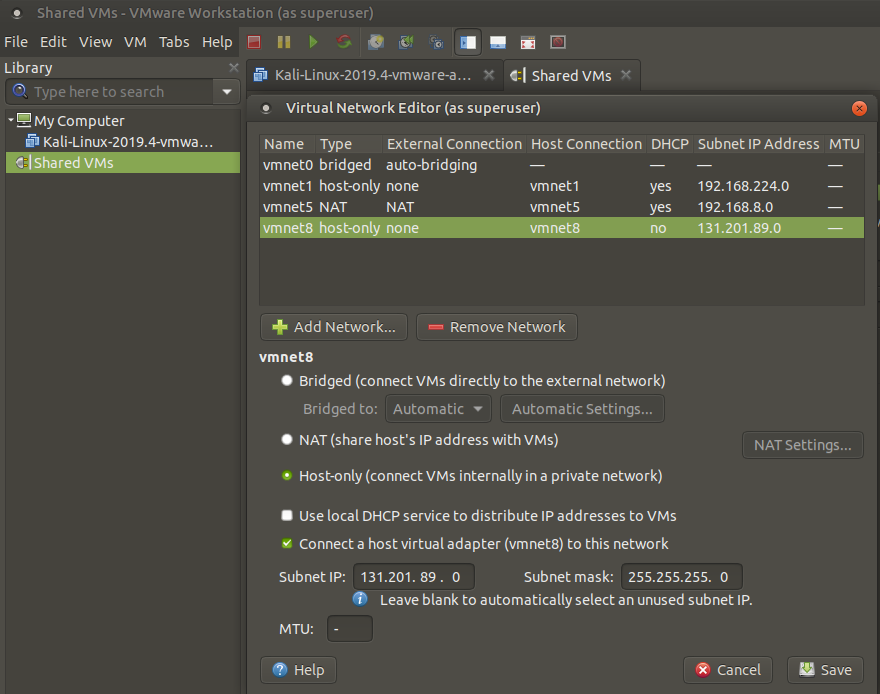
We need to create our virtual network before installing the lab. You can create it by clicking virtual network editor on the edit tab of VMware. Remember, the lab we will create will have our own private network, so we need to set it as Host-Only. Also, DHCP feature should not be active.

Let’s start the installation of Windows Server 2019 by clicking New Virtual Machine on the File tab.
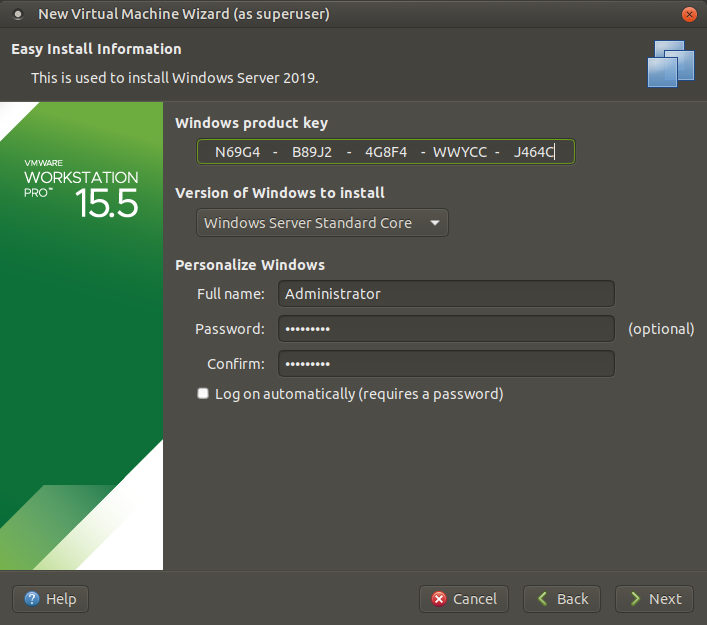
Usually the Administrator user name is used by default. It is generally used as Password1 in the password. In real life, please don’t make such a mistake 🙂

The important point here is that the network setting remains NAT before starting the installation process. Otherwise, the installation process will fail.
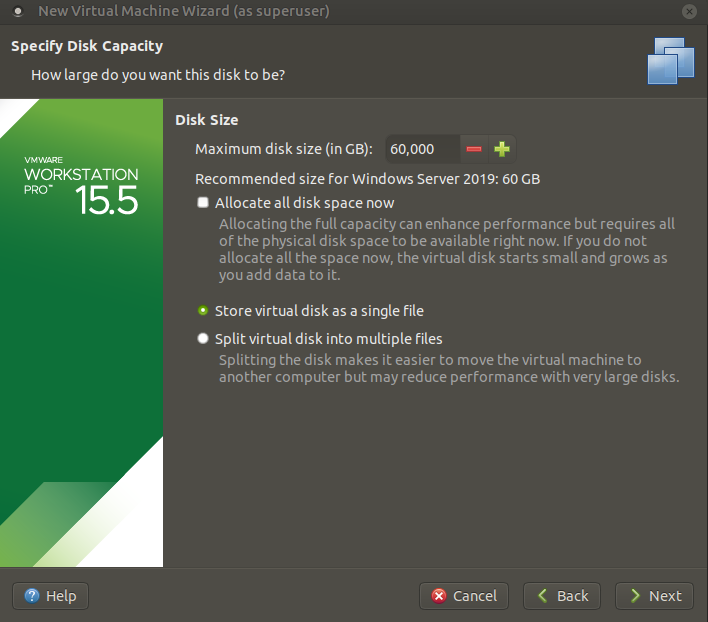
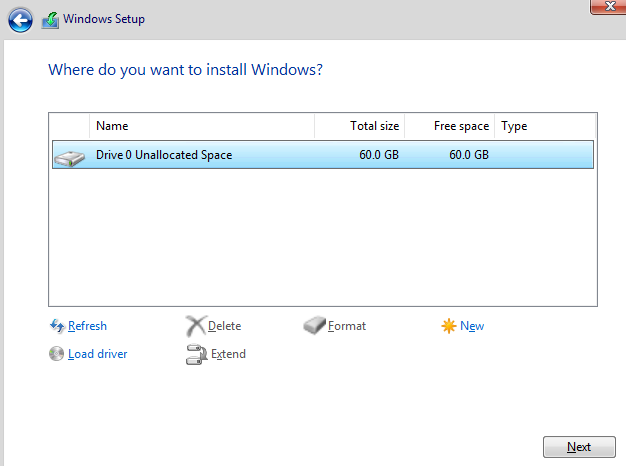
As suggested, a 60 GB virtual disk will suffice.
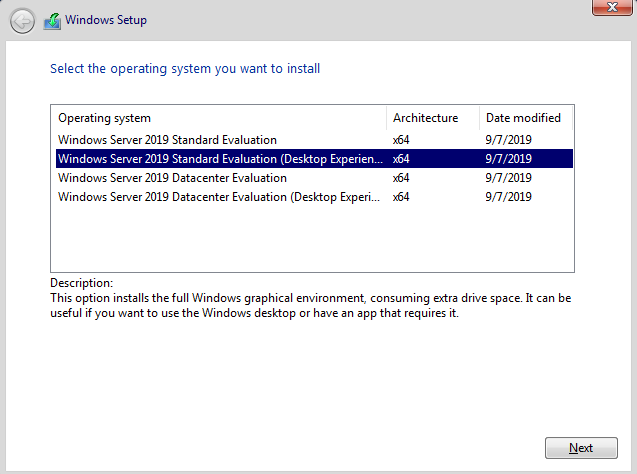
When the virtual machine setup is finished, we can start the server setup. After opening MASTER19, apply the following items in order;
- Select Windows Server 2019 Standard Evaluation (Desktop Experience) and click next
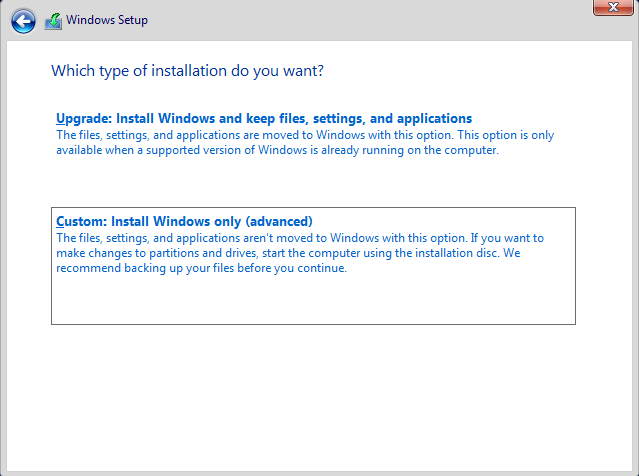
- Select Custom: Install Windows Only (advanced) and click next
- Select Drive 0 Unallocated Space and click next
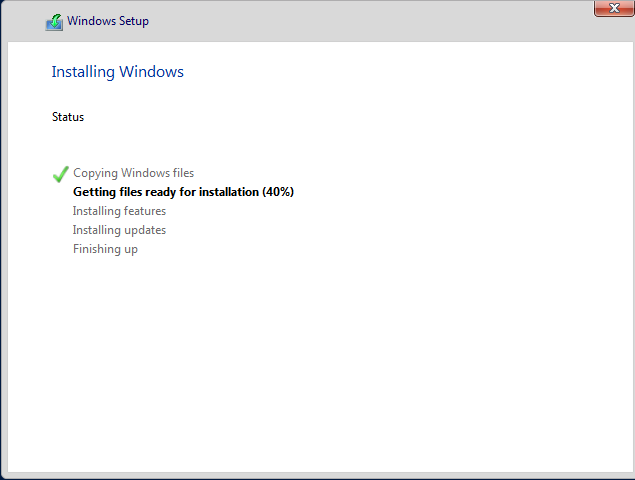
- Server installation will start.
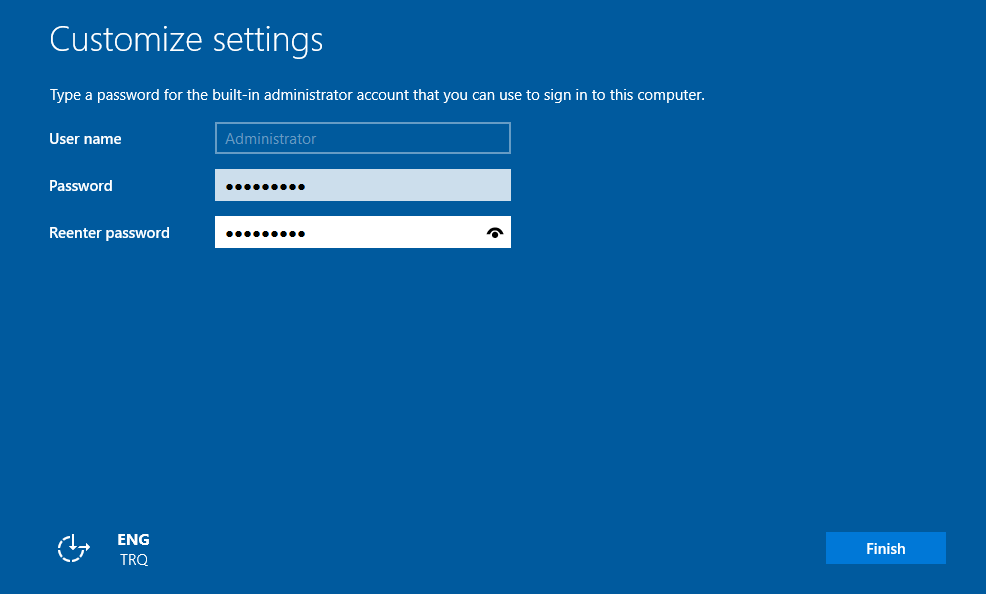
After the virtual machine restarts, enter the password you set on the screen.

Installing one by one on multiple computers with the same hardware features spends time and is an unnecessary workload. We need to ensure that the image we want to copy gives different SID, different user, computer name and license information on each computer. We can achieve this with the “Sysprep” installation tool developed by Microsoft.
DC-MATRIX
To summarize the Domain Controller briefly;
- The servers where the Active Directory Service is installed and configured are called Domain Controllers.
- Authentication operations of all users and computers hosted by Active Directory Domain Services are performed by the Domain Controller.
- At least one can have dozens of DCs as needed.
https://github.com/hebunilhanli/MATRIX.LOCAL/tree/master/DC-MATRIX
DC-MATRIX Setup
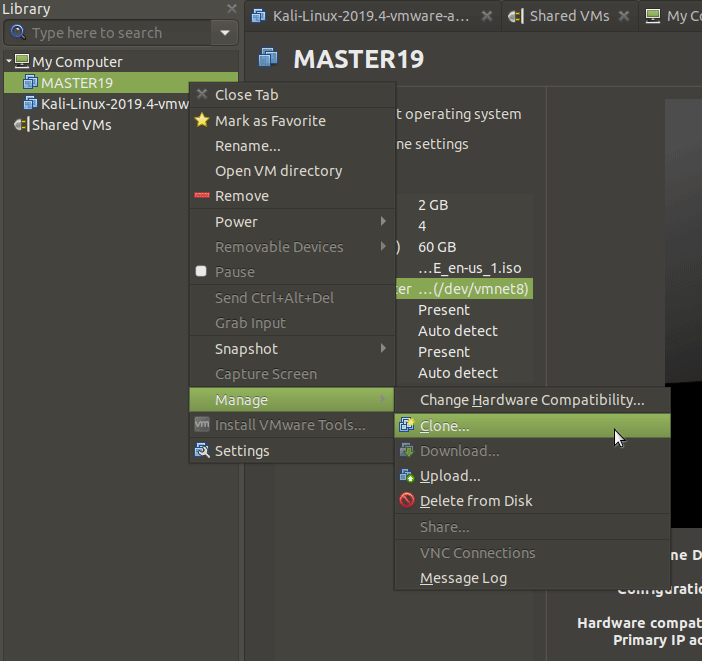
Let’s create our DC machine by copying the pre-installed MASTER19 virtual machine.
NOTE: Don’t forget to change NID…
You can install the DC-MATRIX machine by following the above steps in order.
Let’s start the installation process by opening Windows PowerShell !
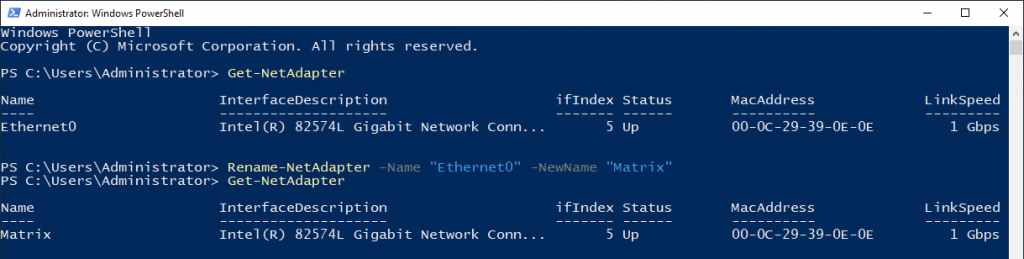
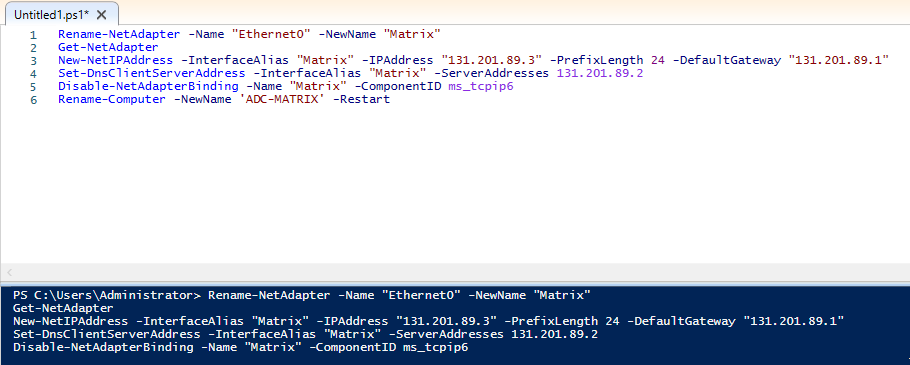
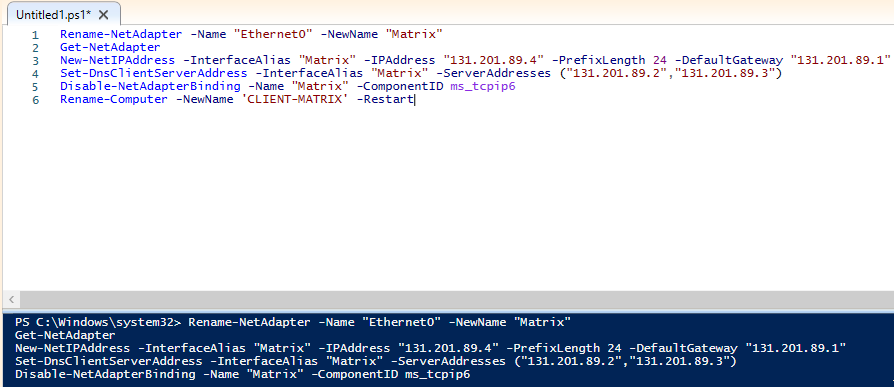
Let’s start with learning the name of the network adapter in the command line. It is useful to change the name of the adapter to make it memorable.
| Command | Defination |
|---|---|
| Get-NetAdapter | To list network cards |
| Rename-NetAdapter | Change of the NIC (Network Interface Card) name physically installed on the server. |
| -Name | Existing name |
| -NewName | New name to be given |
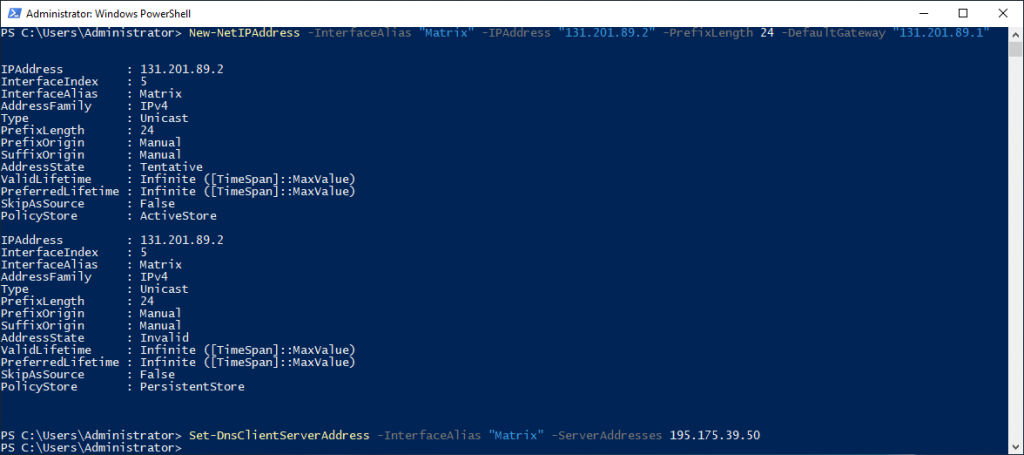
Then, since the Network ID is 131.201.89.0/24, let’s give our IP value according to this ID. I gave the IP address of Türk Telekom as DNS Server Address. Currently, the Lab environment is not accessible externally. Private Network…
| Command | Defination |
|---|---|
| New-NetIPAddress | Defining an IP address |
| -InterfaceAlias | Current name of the network card used |
| -PrefixLength | Subnet mask (e.g 255.255.255.0 = 24) |
| Set-DnsClientServerAddress | DNS server address |
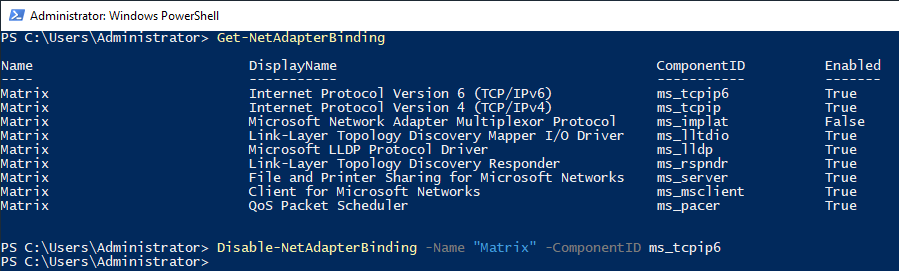
Let’s turn this protocol off as there is no need for IPv6-related configuration right now. To close this protocol, we first need to learn the Component ID value.
NOTE: Default ID of IPv6 is ms_tcpip6.
| Command | Defination |
|---|---|
| Get-NetAdapterBinding | Connectors that are active on the network card |
| Disable-NetAdapterBinding | Disabling the component |
Rename-Computer -NewName ‘DC-MATRIX’ -Restart
Finally, with the command above, let’s change the name of our computer and restart it.
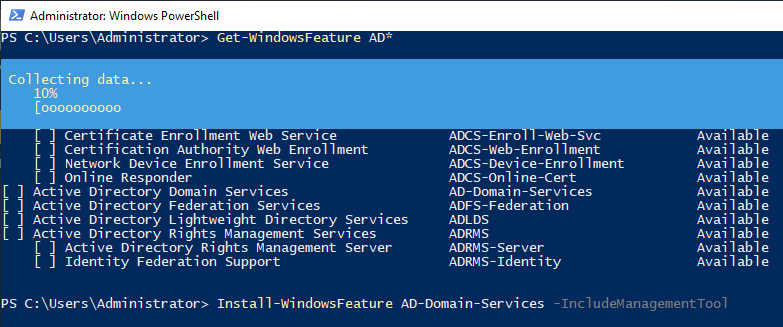
We brought information about the roles and services available on the server. According to lab plan, we will define the role of Active Directory Domain Services on this virtual machine.
| Command | Defination |
|---|---|
| Get-WindowsFeature | It brings information about the role, Feature list, and states. |
| Install-WindowsFeature | The command used for role and feature installation |
| AD-Domain-Services | It represents the role we want to load. |
| -IncludeManagementTools | For the installation of administrative tools required for ADDS. |
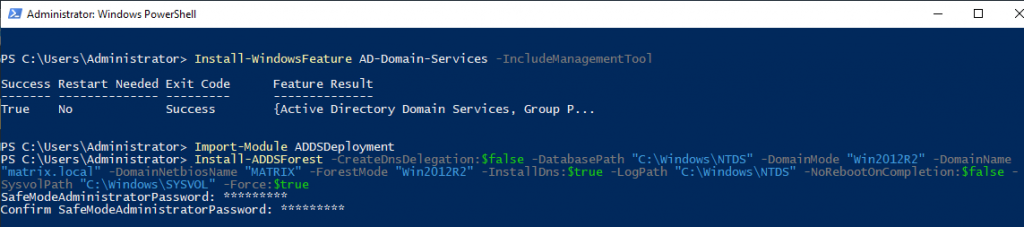
After the ADDS installation process is completed, the ADDSDeployment module must be imported. All modules and commands do not come as defaults to improve server performance. Therefore, we should import the modules according to our needs. In order to use the created device as a domain controller, Active Directory Domain Services role has been installed and a forest named matrix.local has been created in the promate section. The installation of the DNS role with ADDC has been performed. Forest will ask you to create a password for Safe Mode before installation begins.
| Command | Defination |
|---|---|
| Import-Module | Importing the PowerSh*ll module |
| Install-ADDSForest | A new Active Directory Forest installation |
| -CreateDnsDelegation | Creates a delegation for the domain in DNS |
| -DatabasePath | That will contain the domain database |
| -DomainMode | The domain functional level of the first domain in the creation of a new forest |
| -DomainName | The fully qualified domain name for the domain |
| -DomainNetbiosName | The NetBIOS name for the root domain in the new forest. |
| -ForestMode | The forest functional level for the new forest |
| -InstallDns | Determined whether a DNS role needs to be installed for the DC |
| -LogPath | The location where the domain log files will be saved |
| -NoRebootOnCompletion | Not reboot the computer upon completion of this command |
| -SysvolPath | Define the SYSVOL folder path |
| -Force | Forces a command to execute, ignoring the given alert. |

After entering the password, the Forest structure will start to be established. Server will be restarted after the installation process is finished.
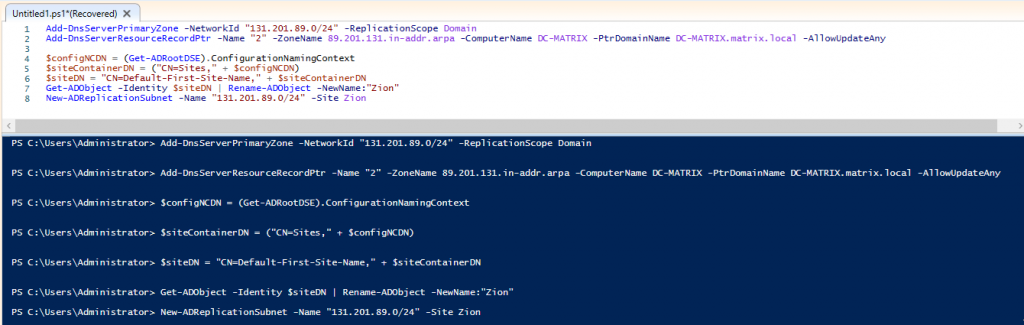
We need to create a primary zone for the completed DNS role. You can apply the following commands quickly with PowerShell ISE.
| Command | Defination |
|---|---|
| Add-DnsServerPrimaryZone | Adds primary zone on a DNS server |
| -NetworkID | Network ID and prefix length for a reverse lookup zone |
| -ReplicationScope | The domain directory partition on which to store an Active Directory-integrated zone. |
| Add-DnsServerResourceRecordPtr | Adds pointer (PTR) record to a specified Domain Name System (DNS) zone. |
| -Name | Part of the IP address for the host |
| -ZoneName | The name of a reverse lookup zone |
| -ComputerName | DNS Server |
| -PtrDomainName | FQDN for a resource record in the DNS namespace |
| Get-ADObject | Get an Active Directory object or performs a search to retrieve multiple objects |
| -Identity | Active Directory object by providing one of the following property values |
| New-ADReplicationSubnet | To creates a new Active Directory subnet object |
| -Site | The site associated with this subnet |
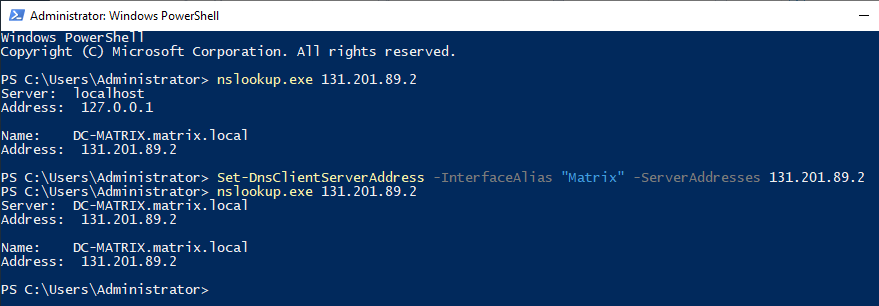
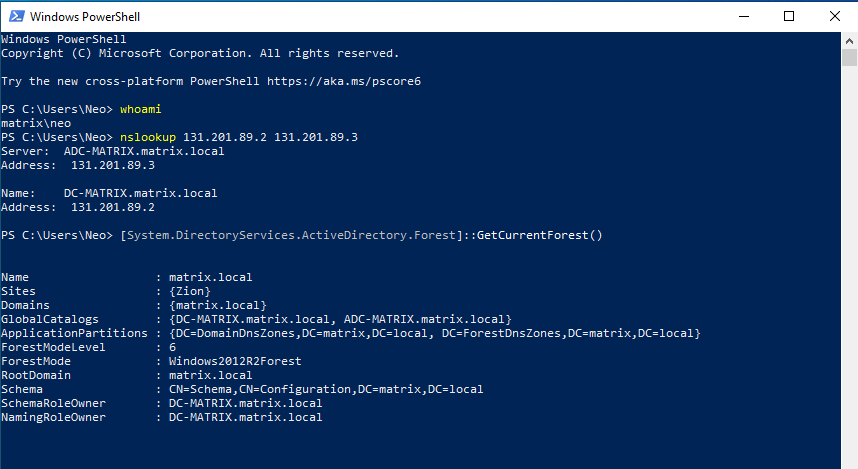
When we query the IP address with nslookup, we now see that our DC-MATRIX server has successfully defined the DNS role. At the beginning of the article, Türk Telekom now writes local ip instead of the IP address written in DNS. Instead of the value of “127.0.0.1”, let’s enter the IP address “131.201.89.2” that we set at the beginning of the article again.
After performing the required DNS setups, we can add users to AD structure with PowerShell ISE.
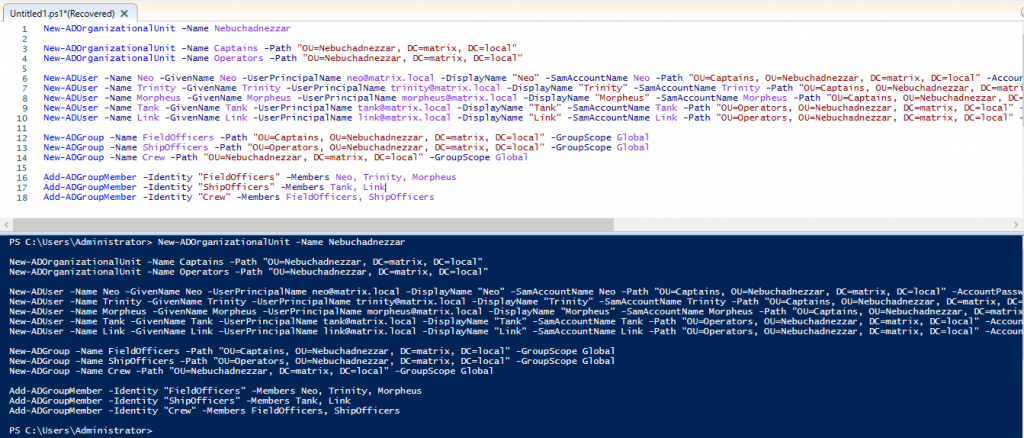
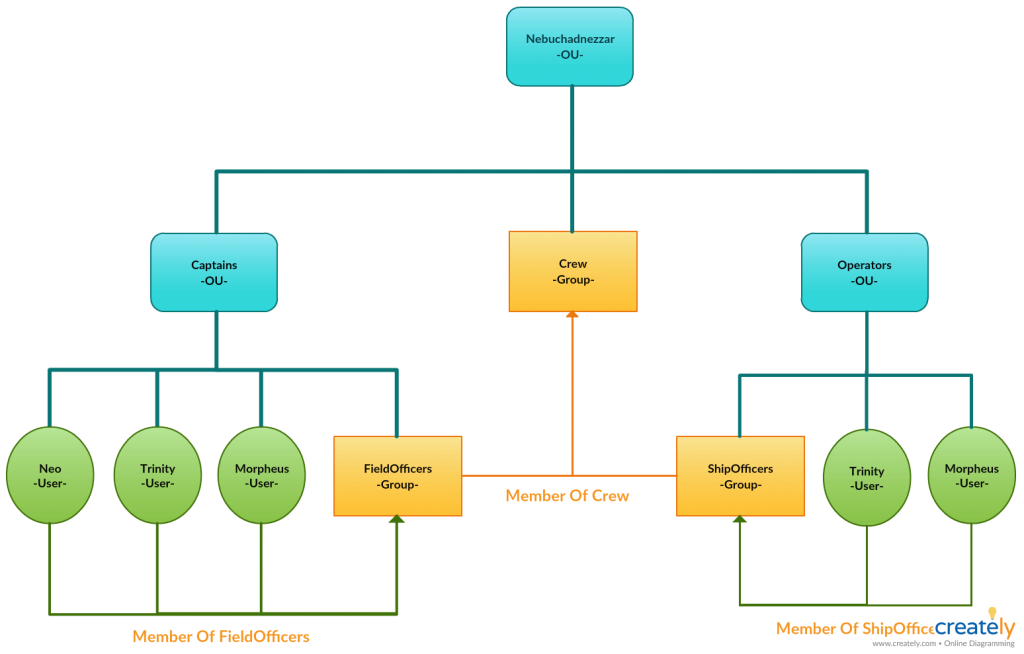
Let’s create an Organizational Unit (Nebuchadnezzar) in which we can accommodate objects such as users, computers, printers and groups. Since the design of the OUs is hierarchical, I added different OUs in it (Captains and Operators). Then add users and groups to these OUs. I subscribe users to groups. Then I create a main group and join other groups to this main group.
You may be confused, not a problem … You can understand how hierarchy I created by examining the chart below.
| COMMAND | DEFINATION |
|---|---|
| New-ADOrganizationalUnit | To create an Active Directory organizational unit (OU) |
| -Path | Path of the OU or container where the new object is created |
| New-ADUser | To create an Active Directory user |
| -UserPrincipalName | UPN in the format <user>@<DNS-domain-name> |
| -AsSecureString | To create a secure string from an encrypted standard string |
| New-ADGroup | To create an Active Directory group object |
| -GroupScope | Property of a group object to the specified value |
| Add-ADGroupMember | As new members of an Active Directory group |
| -Members | An array of user, group, and computer objects |
Yes guys, I want to let you know that the installation of the DC-MATRIX machine is now over. Now we need to install the ADC-MATRIX machine.
Come on, don’t stop!
ADC-MATRIX
Additional Domain Controller are secondary servers that are configured to provide redundancy and increase performance of servers. For example, as a result of a DC crash, ADC can be activated and operations can continue without problems in the Active Directory structure.
We can start the installation process… Let’s create our virtual machine by examining the following items;
- Clone Virtual Machine From MASTER19: Figure – 12
- Configuration of ADC-MATRIX Virtual Machine: Figure – 13
https://github.com/hebunilhanli/MATRIX.LOCAL/tree/master/ADC-MATRIX
ADC-MATRIX Setup
Network Configuration… Remember, we now have a DNS in our AD structure. So we will give the DNS address the IP address of the DC-MATRIX server.
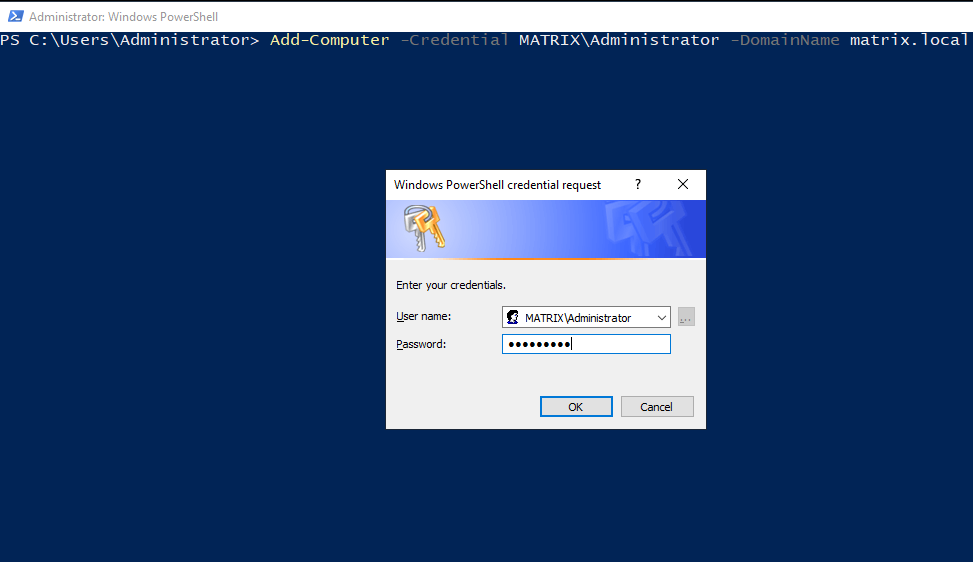
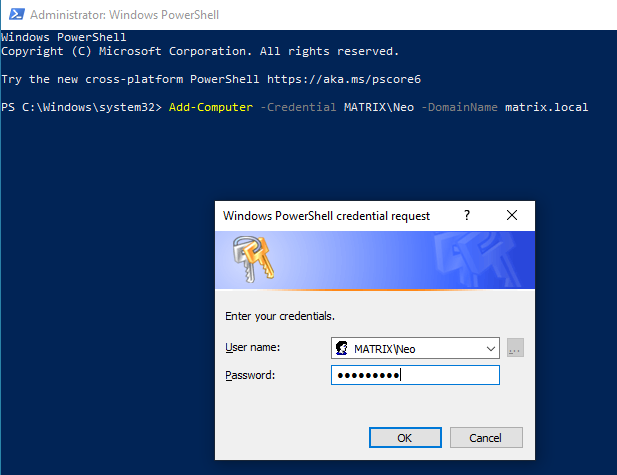
We will use the Administrator user in the User group in DC-MATRIX to be included in an AD on the network.
| COMMAND | DEFINATION |
|---|---|
| Add-Computer | To add the local computer or remote computers to a domain or workgroup |
| -Credential | User account that has permission to join the computers to a new domain |
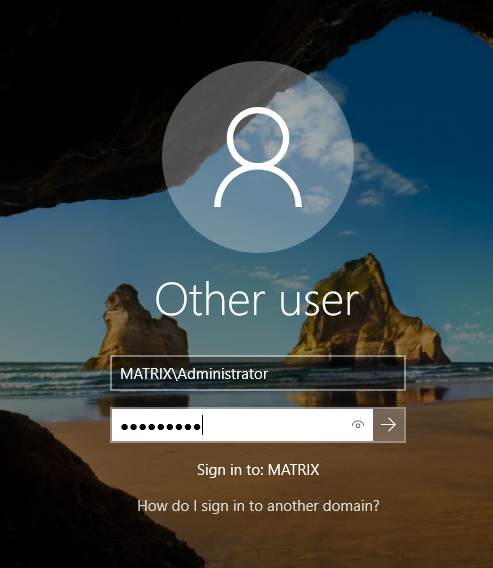
After the computer restarts, click the Other User tab and enter the user name you see on the screen. Attention ! The Administrator used here is the user of the domain. Not a local user.
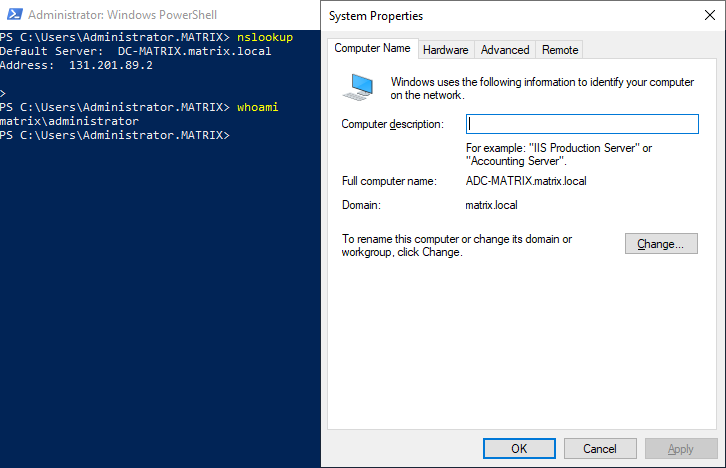
Let’s use nslookup to check if we can join the domain without any problems.

Run the following PowerShell command to add an Additional Domain Controler. When you run the command as before, it will ask you to create a recovery password. By the way, this password does not have to be the same as DC-MATRIX.
| COMMAND | DEFINATION |
|---|---|
| Install-ADDSDomainController | Installs a domain controller in Active Directory |
| -CreateDnsDelegation | Creates a delegation for the domain in DNS |
| -DatabasePath | That will contain the domain database |
| -DomainName | The fully qualified domain name for the domain |
| -InstallDns | Determined whether a DNS role needs to be installed for the DC |
| -LogPath | The location where the domain log files will be saved |
| -NoGlobalCatalog | Defines if domain controller will hold a global catalog replica or not |
| -SiteName | Existing site where you can place the new domain controller |
| -SysvolPath | Define the SYSVOL folder path |
| -NoRebootOnCompletion | Not reboot the computer upon completion of this command |
| -Force | Forces a command to execute, ignoring the given alert. |
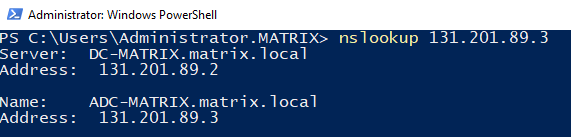
After the computer restarts, you can see that ADC-MATRIX also takes DNS role. We can say that the configurations of our servers are now complete. Now let’s move on to the installation of the CLIENT-MATRIX machine.
CLIENT-MATRIX
You can follow the sequence below to perform the installation procedures.
- You can download and install the ISO file from the link I provided to create the virtual machine: Figure – 2, Figure – 4 and Figure – 5.
- Let’s not forget to choose NID from CLIENT-MATRIX settings… 131.201.89.0/24
- After starting the virtual machine, you can proceed to ISO setup: Figure – 7, Figure – 8 and Figure – 9
https://github.com/hebunilhanli/MATRIX.LOCAL/tree/master/CLIENT-MATRIX
CLIENT-MATRIX Setup
We need to make the configurations of Windows 10 machine. I entered this “…89.4” IP because the domain has the NID 131.201.89.0/24.
The process done here is to add the computer to your domain. The most confused detail here is that only Domain Admin can add users. WRONG ! Any authenticated user can add the computer to the domain. After the login is confirmed, you can restart the computer.
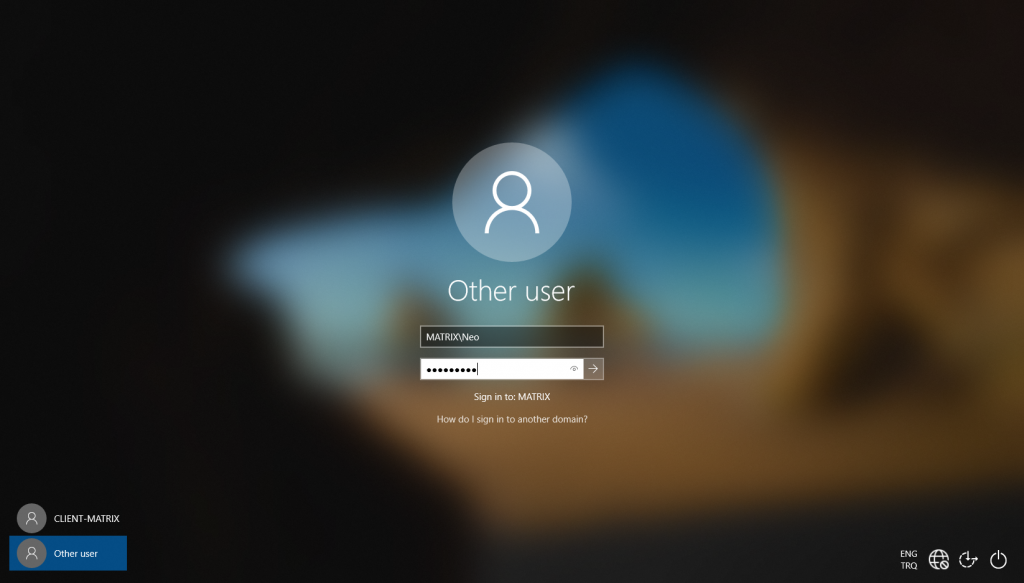
It’s time to use the users which we created for the domain… You can log in from the users we created by clicking the Other User tab at the bottom left.
And now our lab is ready… DC, ADC and CLIENT computers are ready. With this lab, we will learn many tools to pentest AD structure.
See you in the next article…
Reference:
https://docs.microsoft.com/en-us/powershell/module/addsadministration/?view=win10-ps
For Active Directory Modules
——————————————————————————————————
For Active Directory Installation
For Active Directory Security